How To Make Easy Cheesy Garlic Pull Apart Bread
Introduction
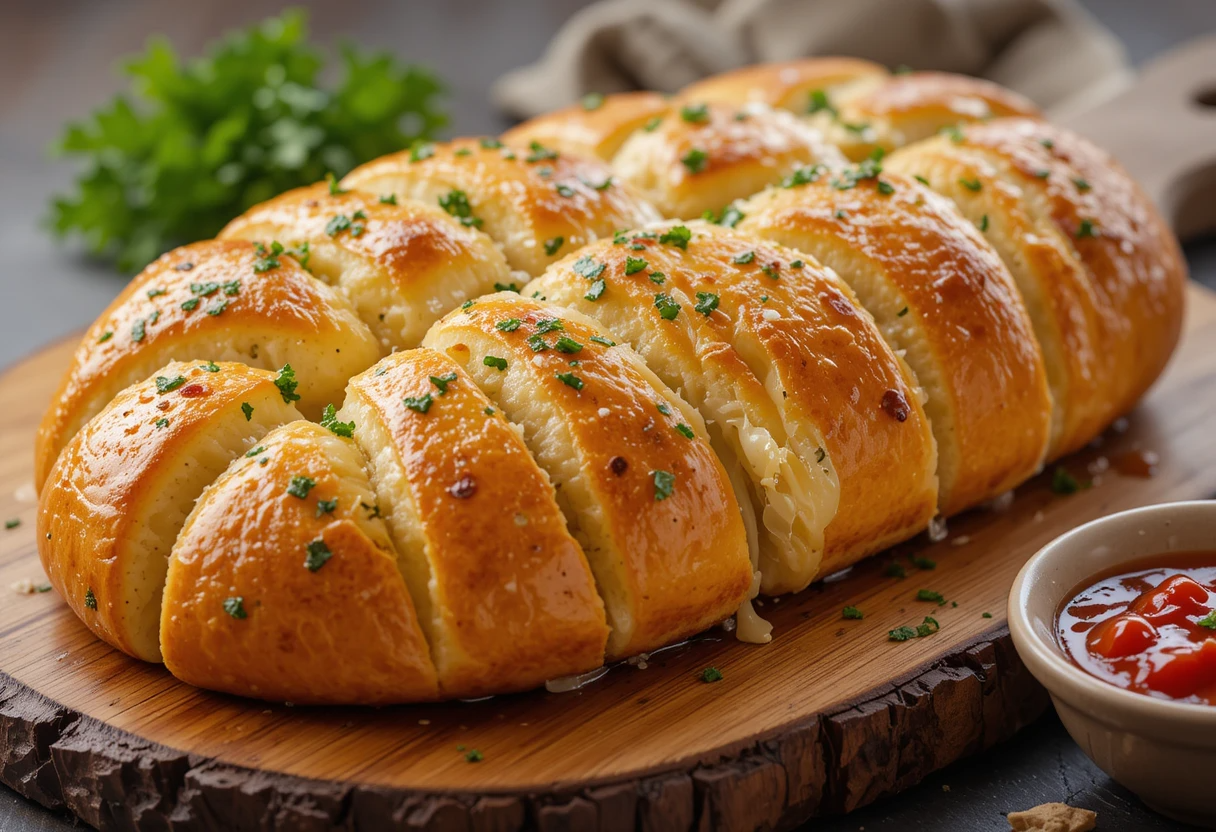
Cheesy Garlic Pull Apart Bread stands as one of the most beloved shareable appetizers in casual dining. This crowd-pleasing dish combines the irresistible elements of a crispy, golden-brown crust on the outside with strings of gooey, melted cheese and rich garlic butter infused throughout. With each pull, guests are rewarded with a perfect bite that balances savory garlic, aromatic herbs, and stretchy cheese.
Whether you’re hosting a game day gathering, family dinner, or just craving a decadent snack, this versatile dish delivers an interactive eating experience that few can resist. For cheese lovers, it represents the perfect indulgence, while party hosts appreciate its dramatic presentation and ability to bring people together around the table, making it a must-try addition to your culinary repertoire.
Table of Contents
What is Cheesy Garlic Pull Apart Bread?
Cheesy Garlic Pull Apart Bread is a tactile and communal dish that transforms ordinary bread into an extraordinary eating experience. At its core, it’s a loaf of bread that’s been strategically cut into a crosshatch pattern (without cutting all the way through the bottom), allowing the flavorful mixture of garlic butter and cheese to penetrate deep into every crevice. When baked, the exterior develops a crispy, golden crust while the interior remains soft and filled with molten cheese.
What makes this dish truly special is its interactive nature – diners literally “pull apart” sections of the bread, revealing the stretchy cheese and aromatic garlic butter within. This creates not only a delicious eating experience but also a memorable shared moment around the table.
The key components include:
- Bread: Most commonly a round sourdough or Italian boule, though baguettes or even homemade dough can be used
- Cheese: A combination of mozzarella for stretch, cheddar for flavor, and parmesan for depth
- Garlic butter: A mixture of softened butter, minced garlic, and herbs
- Seasonings: Often including parsley, oregano, red pepper flakes, and salt
Variations abound, with some recipes using store-bought bread for convenience, while others start with homemade dough for a truly from-scratch approach. The beauty of this dish lies in its adaptability to different tastes and ingredients while maintaining its essential pull-apart nature.
Ingredients Needed
To create a classic Cheesy Garlic Pull Apart Bread, you’ll need the following ingredients:
For the Base:
- 1 round loaf of bread (sourdough or Italian bread work excellently)
- 8 oz (225g) mozzarella cheese, shredded
- 4 oz (115g) cheddar cheese, shredded
- 2 oz (55g) parmesan cheese, grated
For the Garlic Butter:
- 1/2 cup (115g) unsalted butter, softened
- 4-5 cloves garlic, minced (adjust according to taste)
- 2 tablespoons fresh parsley, finely chopped
- 1 teaspoon Italian seasoning
- 1/2 teaspoon salt
- 1/4 teaspoon black pepper
- 1/4 teaspoon red pepper flakes (optional)
Possible Substitutions:
- Bread: French bread, ciabatta, or even homemade pizza dough can be used
- Cheese: Fontina for a more sophisticated flavor, pepper jack for heat, or provolone for a milder taste
- Herbs: Fresh basil, thyme, or rosemary can replace or complement parsley
- Butter: Olive oil can be used for a Mediterranean twist (though it won’t solidify like butter)
- Garlic: Roasted garlic for a sweeter, milder flavor, or garlic powder (1 teaspoon) in a pinch
Quality ingredients make a significant difference in this simple dish, particularly the bread and cheese. When possible, opt for freshly baked bread and block cheese that you shred yourself for superior melting properties.
How to Make Cheesy Garlic Pull Apart Bread (Step-by-Step)
Preparation (10 minutes):
- Preheat your oven to 350°F (175°C).
- Prepare the garlic butter by mixing softened butter, minced garlic, chopped parsley, Italian seasoning, salt, pepper, and red pepper flakes (if using) in a small bowl until well combined. Set aside.
- Mix the cheeses in a medium bowl, combining the shredded mozzarella, cheddar, and half of the parmesan. Reserve the remaining parmesan for topping.
Cutting and Stuffing the Bread (15 minutes):
- Place the bread on a cutting board and use a serrated knife to make parallel cuts across the loaf, approximately 1 inch apart, being careful not to cut all the way through the bottom crust.
- Rotate the loaf 90 degrees and make another set of parallel cuts perpendicular to the first set, creating a crosshatch pattern of bread cubes still attached at the bottom.
- Gently open the cuts with your fingers, being careful not to separate the pieces entirely.
- Use a small spoon or knife to spread the garlic butter mixture into the cuts, ensuring it reaches deep into the crevices.
- Stuff the cheese mixture between the cuts, distributing it evenly throughout the bread. Don’t worry if some falls out – you can place it back in or on top before baking.
Baking (25-30 minutes):
- Wrap the bread in aluminum foil, leaving the top partially open.
- Place on a baking sheet and bake for 15 minutes.
- Remove the foil and sprinkle the reserved parmesan cheese on top.
- Return to the oven uncovered for another 10-15 minutes, until the cheese is completely melted and the top is golden brown and crispy.
Finishing Touches:
- Remove from the oven and let it cool for 5 minutes (this helps the cheese set slightly and prevents burning).
- Garnish with additional fresh parsley if desired.
- Serve immediately while still warm and the cheese is gooey.
Pro Tips for Perfect Results:
- Use day-old bread for better structural integrity during cutting and baking.
- Don’t skimp on the butter – it should reach all the way down into the cuts for maximum flavor.
- For extra crispy edges, brush a little garlic butter on the exposed top before the final baking stage.
- If the top is browning too quickly, cover loosely with foil until the cheese inside is fully melted.
- For even more flavor, let the garlic butter mixture sit for 30 minutes before using to allow the flavors to meld.
Best Cheeses to Use for Maximum Flavor
The cheese selection can transform your Cheesy Garlic Pull Apart Bread from good to extraordinary. Different cheeses offer unique flavors and textures that contribute to the overall experience:
Mozzarella (recommended amount: 4-8 oz)
- The gold standard for stretch and pull factor
- Mild flavor that complements garlic without overpowering
- Low-moisture mozzarella works best as it melts without making the bread soggy
Cheddar (recommended amount: 2-4 oz)
- Adds a sharp, tangy dimension to the flavor profile
- Creates a beautiful golden color when melted
- Medium or sharp varieties offer the best flavor contrast
Parmesan or Pecorino Romano (recommended amount: 1-2 oz)
- Provides a salty, umami depth
- Creates a crispy top when broiled
- Use freshly grated for best melting properties
Other excellent options:
- Gruyère: Offers a nutty flavor and exceptional melting quality
- Fontina: Delivers a buttery, slightly sweet taste with excellent melt
- Provolone: Mild but distinctive flavor with good stretching properties
- Monterey Jack: Melts beautifully with a mild, creamy taste
For the ultimate cheesy experience, combine at least two types of cheese: one for stretch (mozzarella), and one for flavor (cheddar, gruyère, or fontina). This combination ensures you get both the visual appeal of long cheese pulls and complex flavor development.
Serving Suggestions and Pairings
Cheesy Garlic Pull Apart Bread shines as both an appetizer and a side dish, with various serving options to enhance the experience:
Dipping Sauces:
- Marinara sauce: The acidity cuts through the richness of the cheese
- Ranch dressing: Adds a creamy, herby complement
- Extra garlic butter: For true garlic enthusiasts
- Balsamic glaze: Adds a sweet-tangy dimension
Beverage Pairings:
- Red wine: A medium-bodied Chianti or Zinfandel complements the garlic and cheese
- Craft beer: An IPA or lager balances the richness
- Sparkling water with lemon: Cleanses the palate between bites
Complete the Meal With:
- Italian-inspired soups like minestrone or tomato basil
- Green salads with light vinaigrette to balance the richness
- Pasta dishes, allowing the bread to soak up extra sauce
- Grilled meats or roasted vegetables for a complete dinner
For presentation, serve the bread on a wooden board or in a cast-iron skillet to maintain warmth longer. Place dipping sauces in small bowls around the bread and provide small plates for guests. The communal nature of pulling apart the bread makes it perfect for casual gatherings, while its impressive appearance elevates any dinner table.
Variations and Customizations
The beauty of Cheesy Garlic Pull Apart Bread lies in its versatility. Here are some exciting variations to customize this dish to your taste preferences and dietary needs:
Spicy Version:
- Add 1-2 finely diced jalapeños to the garlic butter mixture
- Incorporate 1/2 teaspoon of cayenne pepper or red pepper flakes
- Use pepper jack cheese in place of some or all of the cheddar
- Drizzle with hot honey before serving for a sweet-spicy kick
Herb-Infused Version:
- Add 1 tablespoon each of fresh rosemary, thyme, and oregano to the garlic butter
- Layer fresh basil leaves between the bread cuts along with the cheese
- Finish with a sprinkle of fresh herbs after baking
- Mix herbs directly into the cheese for distributed flavor
Mediterranean Style:
- Use olive oil instead of butter and add sun-dried tomatoes
- Mix in olives, capers, and feta cheese
- Season with oregano and fresh lemon zest
- Serve with tzatziki sauce for dipping
Vegan Alternative:
- Use plant-based butter or olive oil for the garlic spread
- Substitute vegan cheese alternatives (cashew-based options melt particularly well)
- Add nutritional yeast to the “butter” mixture for extra cheesy flavor
- Enhance with more herbs and garlic to compensate for the milder flavor of vegan cheese
Breakfast Version:
- Add cooked, crumbled bacon or breakfast sausage
- Use cheddar and gruyère cheese
- Incorporate scrambled eggs between some of the bread sections
- Drizzle with maple syrup for a sweet and savory combination
Whatever variation you choose, maintain the fundamental technique of creating cross-hatched cuts and generous filling to ensure the signature pull-apart experience.
Storage and Reheating Tips
While Cheesy Garlic Pull Apart Bread is best enjoyed fresh from the oven, proper storage and reheating techniques can help maintain its delicious texture and flavor for later enjoyment:
Storage Options:
- Refrigeration (1-2 days): Allow the bread to cool completely, then wrap tightly in aluminum foil or place in an airtight container. The tight wrapping prevents the bread from drying out.
- Freezing (up to 1 month): For longer storage, freeze the bread after it has cooled. Wrap in plastic wrap, then aluminum foil, and place in a freezer bag to prevent freezer burn. Label with the date.
- Pre-baked storage: You can prepare the bread up to the point of baking, then refrigerate for up to 24 hours before baking. This makes it perfect for preparing ahead for parties.
Reheating Methods:
- Oven (best method): Preheat to 350°F (175°C), wrap the bread in foil (leaving the top slightly open), and heat for 10-15 minutes until warmed through and the cheese is melted again.
- Toaster oven: Similar to the oven method but perfect for smaller portions. Heat at 325°F (165°C) for 5-8 minutes.
- Microwave (quick but not ideal): Heat individual portions for 20-30 seconds. The bread will soften significantly but lose its crispy exterior.
- Air fryer: For smaller portions, 3-4 minutes at 350°F (175°C) provides a nice balance of speed and texture preservation.
Reviving Tips:
- Brush the top with a little olive oil or melted butter before reheating to restore moisture and crispness
- Sprinkle with a small amount of fresh cheese before reheating to refresh the cheesy layer
- For refrigerated bread, let it come to room temperature for 15-20 minutes before reheating
Remember that the texture will never be exactly the same as freshly baked, but proper reheating can come close to recapturing the original experience.
FAQs about Cheesy Garlic Pull Apart Bread
Q: Can I make Cheesy Garlic Pull Apart Bread ahead of time? A: Yes! You can prepare it up to 24 hours in advance. Complete all steps up to baking, wrap in plastic wrap, and refrigerate. When ready to serve, allow it to come to room temperature for about 30 minutes, then bake as directed, adding an extra 5 minutes to the baking time.
Q: What type of bread works best? A: Round sourdough or Italian boules work exceptionally well due to their sturdy crust and chewy interior. However, French bread, ciabatta, or even homemade bread can be used. The key is choosing a bread with enough structure to hold its shape when cut and stuffed.
Q: My cheese isn’t melting properly. What went wrong? A: Pre-shredded cheese often contains anti-caking agents that can prevent smooth melting. For best results, buy block cheese and shred it yourself. Also, ensure your bread is at room temperature before baking to allow even heat distribution.
Q: How do I prevent the bread from becoming soggy? A: Make sure your bread is at least a day old, which helps it absorb the butter without becoming mushy. Also, don’t overwrap the bread in foil during the initial baking stage, as this can trap too much moisture.
Q: Can I use a different flavor profile besides garlic? A: Absolutely! Consider herb butter with rosemary and thyme, pesto butter, or even a sweet version with cinnamon sugar and cream cheese for a dessert option.
Q: My bread is burning on top but the cheese inside isn’t fully melted. How can I fix this? A: Cover the top loosely with foil if it’s browning too quickly, and continue baking until the cheese is melted. You can also lower the oven temperature to 325°F (165°C) and bake for a few minutes longer.
Q: Is there a gluten-free option? A: Yes, you can use gluten-free bread, though it may not hold together as well when pulled apart. Consider using a gluten-free boule with a firmer texture and make slightly wider cuts to accommodate the different bread structure.
Q: How can I tell when it’s done baking? A: The top should be golden brown, the cheese completely melted, and when you pull one piece slightly, you should see stretchy cheese strands. If using a food thermometer, the center should reach 165°F (74°C).
Conclusion
Cheesy Garlic Pull Apart Bread represents the perfect intersection of simplicity and indulgence. With just a few basic ingredients and minimal preparation time, you can create a showstopping appetizer that consistently delights guests and family alike. The versatility of this dish makes it adaptable to countless variations, ensuring it never becomes boring.
Whether you’re serving it at a casual gathering, alongside a hearty pasta dinner, or as a special treat for yourself, the combination of cripy, buttery joy. Ready to wow? Preheat that oven—let’s get rolling! 🧀✨
“Loved this recipe? Discover more delicious and easy-to-make treats on RecipesSweet – your go-to source for mouthwatering recipes! 🍰✨”